Thursday, September 17, 2015

How to convert MTS/M2TS to MP4 on Mac OS X (E1 Capitan Included)

It's all about how to convert MTS/M2TS to MP4 losslessly on Mac with the fastest Mac MTS to MP4 Converter, so you can play your MTS files more conveniently.


The MPEG Transport Stream (MTS) video format is a type of HD camcorder file format, commonly used by both Sony, Panasonic and Canon. While MP4 is commonly used for sharing video files on ther Internet, or playing on various hardward devices like iPhone, iPad, Xbox, etc. Therefore sometimes people need to convert MTS to MP4 to enjoy and share MTS files with others. This article will show you how to transcode MTS files to MP4 without quality loss as well as M2TS to MP4 conversion on Mac.

A number of media conversion tools are available for the Mac and most are free. Of such tools that you can get online for free, you can also try Brorsoft MTS/M2TS Converter for Mac (Reviews) if you're looking for a MTS converter that does quality conversion work.

Besides MP4, the program can also accomplish the MTS to MOV, AVI, WMV, FLV, ProRes, AIC MOV, MPEG-2 with fast speed and loss-less video quality. If you're using a Windows PC, turn to the Windows version here. See below how to convert MTS to MP4 on Mac OS X(E1 Capitan & Yosemite included).

How to convert MTS/M2TS to MP4 in clicks

Step 1: First, you'll have to import your MTS files. To do this, you may browse for them and load them manually by going to the menu bar and clicking "Add Video" button. Should you want to make things much easier, you can also simply drag and drop them onto the converter's window. Once loaded, your MTS files will be listed.


Step 2: Click “Format” to find “HD Video” catalogue, select “MPEG-4 HD Video (*.mp4)” or “H.264 HD Video(*.mp4)” as the output format. If you want to play the output video files on iPhone, iPad, iPod, etc., you can just choose the corresponding device as the output format to generate videos with optimized settings for a certain device.


Step 3: At last, Click on "Convert". Your converted files will be stored in your Mac after the files you've imported have been converted. The process can be finished in minutes.

Monday, September 14, 2015

How to Play MTS videos on iPhone (iPhone 6S/6S Plus included)


If you need to watch MTS videos on your iPhone, you need to convert MTS to iPhone readable format like MP4 or MOV first. Here is how.


MTS files are high-resolution MPEG-4 AVC/H.264 encoded video files recorded by some HD digital video camcorders such as Sony, Canon, Panasonic and JVC, etc. Although iPhone also supports H.264 codec, it can't directly play MTS video files. If you want to put and play the MTS files on iPhone (iPhone 6S, 6S Plus), you may have to transcode MTS to iPhone compatible video format like MP4, MOV first. Here is how.

To convert MTS to iPhone easily and quickly, we highly recommend Brorsoft MTS/M2TS Converter for Mac to do the tricks. It fully supports MTS format and helps you to directly convert MTS to iPhone friendly formats. No settings required. All iPhone models are supported, including iPhone 6S, 6S Plus, iPhone 6, iPhone 6 Plsu, iPhone 5S, iPhone 5C, iPhone 4S, iPhone 4, iPhone 3GS, iPhone 3, etc. Besides iPhone, this MTS iPhone converter also convert MTS to Final Cut Pro and iMovie format so that you can edit video with these software, saving your lots of time and money.

With it, converting MTS to iPhone on Mac is as simple as ABC. After downloding, follow the wizard to install and run the program. The Windows version is MTS Converter for Windows. Now follow the steps below to encode MTS to iPhone compatible formats in a few clicks!

Easy steps to import MTS videos to iPhone on Mac OS X

Step 1. Add MTS files to the program

Run the Mac MTS to iPhone converter, and then click "Add Video" or "Add from folder" button to load your source MTS files. Batch conversion is supported, so you can load more than one file to save time.

If you have several MTS files and wanna merge them into one for getting a continuous file, you can check the "Merge into one file" option at the bottom of the main interface.


Step 2. Choose output format

Click on Format bar to and choose an output format for iPhone. For example, you can directly select "iPhone 6 H.264 HD 720P(*.mp4)" in "iPhone" column for your iPhone 6. The format, resolution, bit rate and other video settings have been optimized and preset.


Step 3. Start to convert to iPhone on Mac OS X

Lastly, click Convert button and the rest will be finished automatically by the MTS to iPhone Video Converter. If you're converting MTS in batch, it'll take a few time.

To sync the converted video to your device, first connect your device to your Mac. Then find your device in the iTunes' sidebar. In the Summary tab, click Sync at bottom to sync iTunes content to your device.

Conclusion: The advantages of this MTS to iPhone Video Converter for Mac are low CPU usage, fast conversion speed and high quality. The output videos looks quite nice on iPad, iPhone, iPod screen. Now you can put your favorite MTS videos on your iPhone and enjoy them on the go!

If you want to change MKV, VOB, AVI, MPG, WMV, FLV, TiVo, etc. to iPhone playable formats, please turn to Brorsoft Video Converter (available for Windows and Mac users).

You may also like:
How do I view MTS files on my iPad Air 2
Top 3 ways to play MTS files on Mac

Thursday, September 10, 2015

How do I view MTS files on my iPad Air 2

A simple guide on converting and upload MTS files to iPad Air 2 to watch without any trouble.

"I have a Panasonic camera that produces HD videos in .MTS format (codec). I can import these videos with iMovies 11 to my MacBook Pro without problem. But I am not able to import camera files into my iPad Air 2 using the Apple iPad Camera Connection Kit using my camera’s USB cable. I wonder is there an easy way to upload the HD videos in .mts to my iPad Air 2 for viewing?"


Even though there are a lot of video file formats the Apple iPad can support, there are even more file formats that it can't be supported. If you've ever tried watching MTS files with your iPad Air 2, you might have been disappointed to know that it's not going to work in it. To watch .mts files on your iPad Air 2, the the option you have is to convert your MTS file into something that is compatible with iPad Air. This is quick tutorial about how to convert AVCHD video (.mts) to iPad Air 2 compatible formats so that you can play AVCHD(.MTS) movie videos from Sony, Panasonic, Canon, JVC , etc HD camcorders on iPad Air 2.

To encode MTS files to iPad Air 2 easily and quickly, Brorsoft MTS Converter for Mac is highly recommended here. This program features high efficiency and seamless conversion. With it, you can do batch conversion from AVCHD, MTS, M2TS to iPad Air 2 compatible video formats with fast speed and high output video quality. And you just need to do a simple clicks of mouse. Here is how to do it.

PS: If you're using a Windows PC, pls turn to the Windows version.

How to encode MTS files to play on iPad Air 2

Step 1. Download and install the MTS to iPad converter to your Mac, launch the program and drag and drop your MTS files to the program.


Step 2. Select iPad > iPad HD Video(*.mp4) as the export format. The output videos could fit all iPad models(iPad Air 2 included) with excellent quality. Of course, you can also set MP4, MOV or M4V from the "Common Video" drop-down list.


Tip: If you like, click on "Settings" and you could easily set bitrate, frame rate, codec, channels, sample rate, etc to adjust parameters that affect video quality and file size for the video you prefer. Keep in mind bitrate higher results in big file size, and lower visible quality loss, and vice versa.

Step 3. The last step is to click the Convert button to start converting your MTS videos to iPad Air 2.

When the conversion finishes, click Open to get the iPad Air compatible videos. After that, sync the converted MTS videos to iPad Air 2 via iTunes and enjoy them on the go.

Additional Tips: If you're having trouble playing other HD movies formatted in MKV, WMV, VOB, TiVo, FLV and more on iPad Air 2, you can adopt Brorsoft Video Converter for Mac for help.

Monday, September 7, 2015

Best Tool to Convert MTS/M2TS to QuickTime MOV on Mac (OS X El Capitan Included)


Want to convert MTS/M2TS files to MOV for playback on Mac, QuickTime, iPad, iPhone or editing in iMovie, FCP? This article offers you the best answer.


The MTS/M2TS video format, commonly known as "AVCHD", is a High-Definition (HD) video format produced by HD camcorders. However, for Mac users, it's a little bit head-scratching to play MTS/M2TS videos with QuickTime, iPad, iPhone, edit these M2TS/MTS clips in Final Cut Pro/iMovie, or to import to iTunes. These happened may due to the MTS files being raw, or the resolution of the MTS/M2TS videos unsupported. In cases like these, you could convert MTS to MOV for a change, which will fix your problems for MOV is highly compatible with Mac OS (El Capitan and Yosemite included), FCP, iMovie, iOS, and QuickTime, etc. This article provides some possible solutions that definitely worth your time to give it a try.

Best Tool to Convert MTS/M2TS to MOV on Mac

To finish the task, you can adopt Brorsoft MTS/M2TS Converter for Mac(Review) for help. The program is regraded as the best MTS to MOV Converter because it preserved the video quality and finished the Mac conversion at superb fast speed. Its user-friendly interface lets even the software green hand can handle it as easy as a breeze.

What's more, the program can help you transcode MTS/M2TS to native codecs - Apple Intermediate Codec (.mov), ProRes(.mov), DNxHD(.mov) and more - ensuring maximum editing quality and efficiency when working with iMovie, Final Cut Pro, Avid Media Composer or Adobe Premiere and more. You can alsp directly set iPad/iPhone and iPad touch as output device, no need to find specific parameter settings. The built-in video editor allows you to crop, trime and add effects to the video files before starting MTS/M2TS to MOV conversion.

How to Convert MTS/M2TS to MOV on Mac

1. Add MTS/M2TS file to the program

Several choices are available to add MTS files. The most convenient for the user would be to simply plug the camcorder to the computer and the software will automatically identify and expose all MTS files available. Having the MTS files already on the computer, you can also drag and drop them on the program or browse through the computer folders and find your MTS files.


2. Select MOV as out put format

Click Format to choose "Common Video -> MOV - QuickTime (*.mov)" profile in the drop-down menu.


If you want to convert MTS to MOV for Final Cut Pro, iMovie, you are recommended to directly choose "Final Cut Pro > Apple ProRes 422(*mov)" for FCP; "iMovie and Final Cut Express > Apple InterMediate Codec(AIC)(*mov)" for iMovie, FCE.


3. Edit MTS/M2TS files

Click the "Edit" button and edit your videos before processing format conversion. There are main seven functions available: Trim, Crop, Text Watermark, Image/Video Watermark, Effect, Audio Editor, and Subtitle.


3. Start MTS/M2TS to MOV conversion

Finally, click the Convert button to start converting your MTS videos to MOV on Mac.

Once the conversion finished, tap the Open button to get high quality resulted MOV videos. After that, you can play the video files with QuickTime, iTunes or edit them in Final Cut Pro, iMovie FCE, etc. to meet your different needs on Mac OS X.

Additional Tips: If you have QuickTime Pro on your Mac, you can convert your MTS/M2TS videos with it too.

Pros:
QuickTime Pro doesn't only convert your videos, it helps you to play, edit and create home made videos with ease. It's a comprehensive video tool.

Cons:
If you only want a free or cheap MTS/M2TS to MOV Converter for Mac, QuickTime Pro is too expensive.


Sunday, September 6, 2015

How to Play MTS files with QuickTime on Mac (OS X El Capitan Included)

Want to play MTS files on Mac OS X with QuickTime? Below are some solutions for opening MTS files on Mac (include El Capitan). And recommend you some free MTS players for Mac.


MTS is among the most widely used file format for recording videos by many popular HD camcorders, but for Mac users, it's always not so easy to play MTS files with QuickTime player, especially when you have upgraded to the latest OS X 10.11 El Capitan. Actually, QuickTime player doesn't support the MTS or M2TS files natively and there is no plugin for MTS playback in QuickTime. So, is there any possible way to play MTS files with QuickTime? Of course there is. Apart from QuickTime, there are a lot of options to help you play MTS file in the Mac OS X (EI Capitan & Yosemite included).

This article will teach you how to play M2TS/M2TS on Mac with or without extra media player applications. Players shown below might not support playing all MTS/M2TS files, which rests with used compression formats in a MTS/M2TS video file. If MTS/M2TS can't play your video well, try to convert MTS/M2TS to MOV so you can play it with the built-in QuickTime Player.

Method 1: Play MTS/M2TS files on Mac with VLC or other Players


If you've installed VLC media player on your Mac, you can play M2TS/MTS files directly. To do so, search VLC media player from the Internet and download it. Then follow up installation instructions to finish installing this program. After that, drag and drop the MTS video to the play list. Double click it to play the MTS video on your Mac. However, for those who hasn't installed VLC media player, converting M2TS/MTS is an ideal way to play camcorder videos on their Mac.

Tips: You have to install iLife'08 so that you can play MTS/M2TS videos using VLC.

Maybe you can play some M2TS/MTS video files on MPlayer, BSPlayer, Windows Media Player, ALL Player and some other players, which rests with compression formats in a M2TS/MTS video file. For some players, they may need to install a proper codec, component or plug-in unit.

Method 2: Play MTS files on Mac by Converting MTS to QuickTime MOV on Mac

In order to play the recorded MTS/M2TS videos freely on Mac, the once and for all method is converting MTS for Mac. By doing so, you can effortlessly play your cam video on QuickTime, manage in iTunes, edit in iMovie, FCP and more.

To convert MTS/M2TS on Mac easily and quickly, you need a video converting tool for help. Here Brorsoft MTS/M2TS Converter for Mac is strongly recommended. It supports converting MTS/M2TS to QuickTime MOV with the original video quality. It can also edit MTS/M2TS files before converting to an output format. All common video editing tools are included, like Trim, Crop, Rotate, Effects, Watermark, Subtitle, etc.

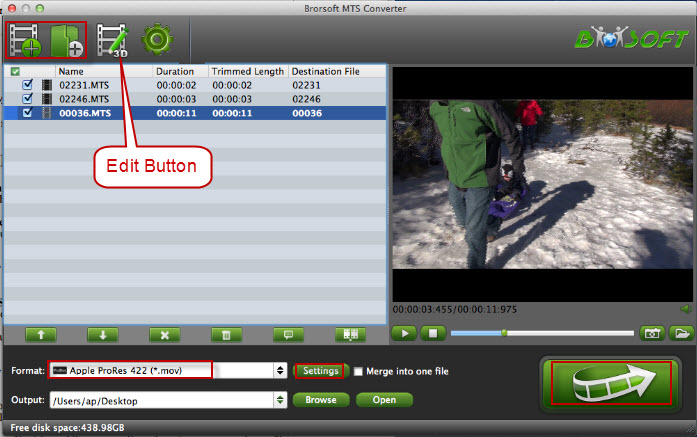
Here are the easy steps to convert and play M2TS/MTS files on Mac

Step 1. Add M2TS/MTS video files

You can add M2TS/MTS video files by dragging and dropping or by plugging the camcorder into the Mac. Or you can click "Add Video" button to locate the MTS/M2TS files to import.


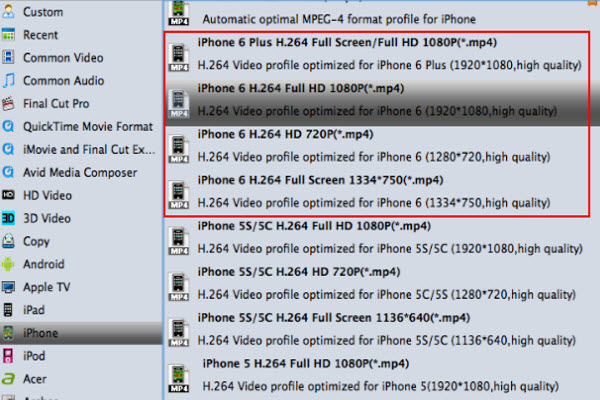
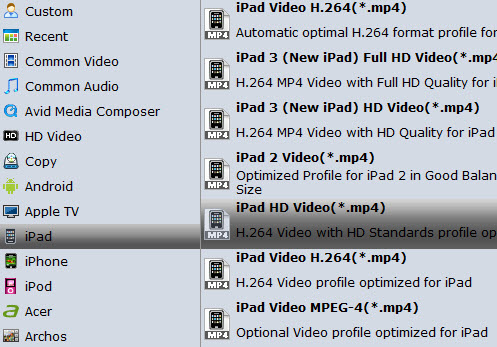
Step 2. Choose MOV as output format

Click Format to choose "Common Video -> MOV - QuickTime (*.mov)" profile in the drop-down menu.


Tricks: If you want to convert MTS to MOV for Final Cut Pro, iMovie, you are recommended to directly choose "Final Cut Pro > Apple ProRes 422(*mov)" for FCP; "iMovie and Final Cut Express > Apple InterMediate Codec(AIC)(*mov)" for iMovie, FCE.

Step 3. Edit the MTS video (optional)

To edit your MTS footage, click the Edit button to open the video editor window. And then you can trim the video, crop video size, deinterlace, add some special video effects, add watermarks, attatch subtitles and more.


Step 4. Start converting MTS/M2TS to MOV on Mac

Finally, click the Convert button to start converting your MTS/M2TS videos to MOV on Mac.

Once the conversion finished, tap the Open button to get high quality resulted MOV videos. After that, you can play the converted MTS/M2TS video files with QuickTime, iTunes or edit them in Final Cut Pro, iMovie FCE, etc. to meet your different needs on Mac OS X.

Tuesday, September 1, 2015

How to Fix .MTS File and Final Cut Pro Incompatibility Issues

Facing problems importing MTS files into Final Cut Pro X, FCP 7 or FCP 6 for using and editing? Simply follow this tutorial to convert MTS to ProRes MOV, which ensures the best results when working with FCP.


MTS is commonly found in AVCHD video clips recorded from camcorders of Panasonic, Sony, JVC, and Canon. Users who want to edit MTS videos with Final Cut Pro usually run into incompatibility issue. Or can't edit them smoothly after taking some time for importing MTS to FCP. Why? Reason for this is your MTS videos are highly compressed by H.264 codec, which are very hard to deal with during video editing.

Then, how to get Final Cut Pro working perfectly with AVCHD MTS footage? As you know, ProRes, a lossy video compression format that developed by Apple Inc., is a appropriate format for smooth editing in Mac. Thus, when you're having trouble importing or editing MTS videos in Final Cut Pro, it's better to take advantage of the ProRes codec. Here I will outline how to transcode MTS files to ProRes MOV for smoothly using FCP 6/7/X.

Converting MTS files to ProRes MOV for Editing in Final Cut Pro

The quick workaround is to use the easy-to-use yet professional app called Brorosft MTS/M2TS Converter for Mac which can be used as a AVCHD MTS to FCP Converter under Mac OS X 10.11 EI Capitan, 10.10 Yosemite, 10.9 Mavericks, 10.8 Mountain Lion, 10.7 Lion, Snow Leopard 10.6, etc. It is free, clean and safe to install and use. With it, you can effortlessly convert MTS to Apple ProRes 422, ProRes 422 HD, ProRes 422 LT, ProRes 4444 for FCP, MPEG-2 for Premiere Pro, DNxHD .mov for Avid MC, etc., and it works well and converts flawlessly. Below is how.

Step 1. Add MTS files to the program

Launch the MTS to FCP Converter on your Mac, then click "Add Video" or "Add from folder" button to load your source MTS files. Batch conversion is supported, so you can load more than one file to save time.

If you have several MTS files and wanna merge them into one for getting a continuous file, you can check the "Merge into one file" option at the bottom of the main interface of the MTS to Final Cut Pro converter.


Step 2. Choose ProRes as the output format

Click the Format icon to reveal output panel. And then select the "Final Cut Pro" category to choose your desired format. You'll find several ProRes formats are provided. Generally, Apple ProRes 422 or ProRes LT are suitable choices for MTS, M2TS, DV videos shot with camcorders. ProRes HQ is usually for film based source media.


Tip:

If the default settings do not fit your needs, you can click "Settings" button to adjust audio and video parameters as you like.


Step 3. Convert MTS to FCP Conversion

Click “Convert” button and the selected MTS files will be converted to Apple ProRes encode mov files. You may check the converting progress and set auto shutdown in the conversion window. After conversion, click “Open” folder to find converted footage for importing to Final Cut Pro 6/7/X.

Additional tips:

The versatile AVCHD MTS Converter Mac is not only designed for converting MTS files for Final Cut Pro. It is also professional in making AVCHD files editable in Adobe Premiere Pro, FCE, Avid Media Composer, iMovie, etc to meet your different needs.